When we were in California, I of course had to stop in my favorite Anthropologie store (in Carlsbad at the Forum)! I obviously couldn't leave without buying a few small things to satiate my Anthro cravings (the thirst is real y'all), one of which being the gorgeous little distressed silver pot below. I've been wanting to do a succulent centerpiece for our kitchen table for quite some time, but I was holding out for the right pot. Well, this was it. So pretty and only $14! And it comes in gold if that's more your thing :) It goes well with our decor and I love that it has rustic glam vibes.
I'm no expert on house plants, but I do have quite a few of them and have been generally successful so far. I really want a huge fiddle leaf fig next! We just don't have the right spot for one in this house though. But with succulents, it's generally recommended to put them in a pot that drains, as they don't like sitting in water. So, I'm taking a bit of a risk with putting them in this pot, but I think I took the right precautionary steps, which I'll outline below.


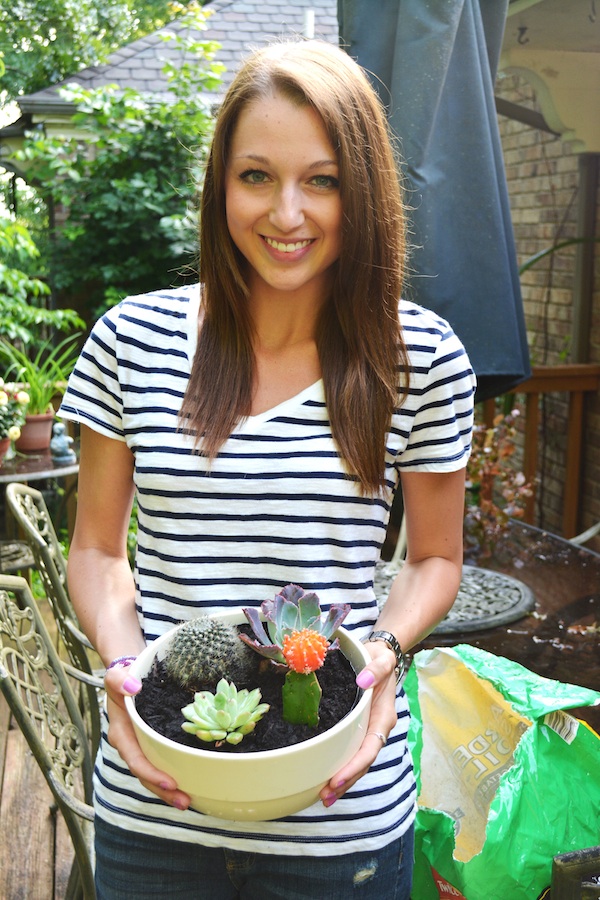
I bought succulents with this pot in mind and spent an embarrassing amount of time in the Lowe's garden center choosing which plants to buy! I am so indecisive. Ultimately the plant on the left didn't make the cut space-wise. I still need to find a home for him!


From the research I had done I found that having a thick layer of rock in the bottom of your succulent planter really helps with drainage. I also bought specific potting mix that is quick-draining! You can't quite tell from the picture, but I filled up between 1/3 and 1/2 of the pot with rock. I bought some cheap aquarium gravel at Wal-mart because it's small and white. More on that later as well!

And then the aftermath of scooping in very powdery soil around very prickly and delicate little plants. I put a small layer of soil on top of the gravel, and then placed the plants with some of the soil that came in their individual pots, filling in with more potting mix as I went. I found it was really hard to get soil in the crevices with gloves or without getting pricked, so I ended up 'shoveling' it in with a plastic spoon and it worked perfectly!


Then I finished up by covering up the soil with another layer of the gravel! I used the plastic spoon again for this so that I could fill it in between the plants really well. The smallness of the gravel allowed me to nestle it in, and I love how the white makes the pot look clean and crisp. You can see a couple of photos up that I also potted a bigger succulent in a classic terracotta pot, which I actually love the look of (in addition to their cheapness).
The number one tip for succulents is to not water them much! In fact, two weeks later I still have these outside by our front door so they're covered from the rain, but can enjoy all of the heat and indirect sunlight. They're loving it! I figured I'd might as well not mess up their flow until it starts cooling off, even though I made them as indoor planters/decorations and really want these little cuties making my house look cooler.
I hope you enjoyed this post! I know it's a little different for me, but I'm looking forward to including more lifestyle and home/decor posts as time goes on and as our house gets more finished.
I'm no expert on house plants, but I do have quite a few of them and have been generally successful so far. I really want a huge fiddle leaf fig next! We just don't have the right spot for one in this house though. But with succulents, it's generally recommended to put them in a pot that drains, as they don't like sitting in water. So, I'm taking a bit of a risk with putting them in this pot, but I think I took the right precautionary steps, which I'll outline below.
I bought succulents with this pot in mind and spent an embarrassing amount of time in the Lowe's garden center choosing which plants to buy! I am so indecisive. Ultimately the plant on the left didn't make the cut space-wise. I still need to find a home for him!
From the research I had done I found that having a thick layer of rock in the bottom of your succulent planter really helps with drainage. I also bought specific potting mix that is quick-draining! You can't quite tell from the picture, but I filled up between 1/3 and 1/2 of the pot with rock. I bought some cheap aquarium gravel at Wal-mart because it's small and white. More on that later as well!
And then the aftermath of scooping in very powdery soil around very prickly and delicate little plants. I put a small layer of soil on top of the gravel, and then placed the plants with some of the soil that came in their individual pots, filling in with more potting mix as I went. I found it was really hard to get soil in the crevices with gloves or without getting pricked, so I ended up 'shoveling' it in with a plastic spoon and it worked perfectly!
Then I finished up by covering up the soil with another layer of the gravel! I used the plastic spoon again for this so that I could fill it in between the plants really well. The smallness of the gravel allowed me to nestle it in, and I love how the white makes the pot look clean and crisp. You can see a couple of photos up that I also potted a bigger succulent in a classic terracotta pot, which I actually love the look of (in addition to their cheapness).
The number one tip for succulents is to not water them much! In fact, two weeks later I still have these outside by our front door so they're covered from the rain, but can enjoy all of the heat and indirect sunlight. They're loving it! I figured I'd might as well not mess up their flow until it starts cooling off, even though I made them as indoor planters/decorations and really want these little cuties making my house look cooler.
I hope you enjoyed this post! I know it's a little different for me, but I'm looking forward to including more lifestyle and home/decor posts as time goes on and as our house gets more finished.
xo,
Jacy
Here are some of my favorite pots and planters I found online! My pot is linked through the first photo :)